Saturday, February 13, 2010

Projects in Queue

Couple of days ago I received my tiny order from MJ Trimming. Unfortunately, the most anticipated item is backordered, so I'll have to wait 6 wks for it to arrive. Then, one of the other things I ordered was in less than perfect condition, and MJ is reshipping it. I hate when things like this one happen; you are all pumped up and then you have to wait.
Meanwhile, I went to Joann and got some materials to possibly fix the less then perfect item, and I think I succeeded. Today and/or tomorrow I am hoping to have my project finished and will post about it. Hint: it is one of those DIY designer embellishments I posted earlier about, and it involves feathers!

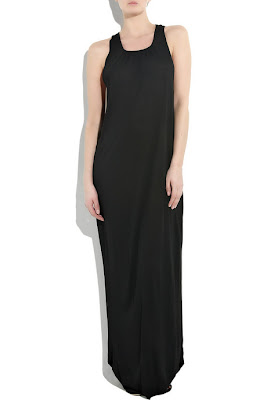
While in Joann I also got a cheap knit for muslins. Yesterday morning I was browsing the blogs I follow, and Grechen from http://grechenscloset.com/ had posted a link to the RTW by L’Agence. I knew nothing about the line, which apparently is brand new, launched in 2008 by the famed L.A. agent Margaret Maldonado. Another thing I learned was that each collection is guest-designed by fashion's most talented stylists. Back-story aside, I was drawn to the neutral easy-chic, effortlessness, and the diaphanous sensuality of the line. I decided to try and replicate, perhaps interpret, some of the pieces.
The most challenging (because I want it exactly the way the designer made it) and most desirable piece, for me, is the criss-cross back maxi dress:
Ialso really like the maxi skirt, which I'd probably make in black:


Lastly, they had two tops that appealed to me. This loose scoop-neck one:


And this oversized, off-the-shoulder top/tunic:

Wednesday, February 10, 2010

Pregnancy style # 3 - Military

This post could also have been called "Shopping Your Wardrobe." Since the recession hit, this seeems to be a popular topic.

A pregnant reader commented that she finds it difficult to dress her body. I agree. It is not easy. Affordable maternity clothing is quite wack size-wise, and the designs are rather dowdy. There are places where you can buy really nice maternity wear, however, I am opposed to spending major money for pieces that will be worn for only a few months. I suppose that would make sense in case this is your 1st pregnancy and you plan on being pregnant 2-3 more times. Not my case.

Right now, I am determined to hold off buying/making anything maternity till I absolutely have to. I simply select looser styles from what I already have. For example, almost everything in the pictures below has been owned for a long time (the boots for more than 8-9 years). The only reletively new item is the pant, which I got from the GAP sale. Actually, speaking of the GAP, since Patrick Robinson took over the GAP creatively, I have really been pleasantly surprised by what I seee in their stores.


Btw, I have never worn red lipstick, but yesterday I got this one from the Lancome counter yesterday, and actually like both the texture (it's their long lasting one) and the color.


(GAP cargo paint splatter pants, GAP military parka, Marshiall's sweater and tank, rabbit fur vest purchased locally, and brown studded boots from loooong time ago)

Monday, February 8, 2010

Pregnancy Style #2

This is the second post to the "Pregnancy Style" feature.
I think layering can get you far in the 1st and 2nd trimesters of pregnancy. I like longer and lighter underlayers and shorter and darker top layers. Note on pants: I got these Blank jeans from the Saks Outlet and I wanted to comment on them. They look 100% as jeans, however, the fabric is not denim. I believe it is cotton something with a lot of stretch. Citizens has a similar jeggings style(also in black), but with a higher rise, and I think it is a new style for the brand, hence, selling at full price. Anyway, Tthe Blank jeggings are perfect for my situation because they stretch a lot, have a very low front rise, keep their shape, and stay up. Oh yes, they have zippers at the bottom outseam, so I can wear them over heals without having to scrunch!
Here I am leaving for class:


(wearing Blank jeans, Inhabit cottton t-shirt, Ivan Grundahl sweater, DIY tube scarf, and DIY necklace)

I maded the necklace some time ago when I had a jewelry-making phase. back then I posted detailed photos of the few pieces I made. Anyway, I love this one. It is so simple - antigue-finished chain laced with leather cord and knotted at the bottom. It has turned out to be incredibly versatile. I have worn it tens and tens of times.

Thursday, February 4, 2010

Easy to DIY Designer Details - Spring 2010


1. This first idea is as easy as it can possibly be. You need a tank and ribbon. Of course, the ribbon pieces can be made at home from silk or silk-like fabric. You'll need to decide where you would like to attach the ribbon, cut the tank straps there, and attach the ribbon pieces.


(Nordstrom.com)

2. This is a Philip Lim cardigan. The design is, obviously, for a wrap cardigan, yet, I think it wil work on a regular one as well. I tried to decipher the material of the ribbons, and I think they are from a silk-like material, or possibly silk (not sure though). In my opinion, a soft velvet ribbon will work as well.


(Nordstrom.com)

3. For this last project, which is a Gryphon sweatshirt, you will need to find a premade crystal-sequin applique (mjtrim.com has those, and possibly many other retailers). If the applique is smaller, you can apply a piece to each shoulder, is an epaulette manner (se below); or you can go with a larget applique and attach to one shoulder only (such in the Gryphon design). This one is perhaps my favourite projects of teh three. I like the how the sporty fabric and cut are dresses up (but not too much) my the sparkly applique. I am thinking of trying this one out.


(Gryphon sweatshirt, Nordstrom.com)

(Son of John pullover, shopbop.com)

Pregnancy Style #1

I am starting a "Pregnancy Style" feauture on my blog. I plan on documenting (at least once a week) what I will wear during my pregnancy.

So, let's begin. I wore this outfit when the whole family went to the outlets and then had a late lunch at a local Mexican restaurant.
( dark purple Inhabit cashmere sweater, gray pleated skirt, Long woolen cardigan, gray scarf, black hose, and gray suede ankle booties)

Wednesday, February 3, 2010

Draped Skirt Tutorial

I have recently found this tutorial for a very interestingly draped skirt:
http://life-in-travel.blogspot.com/2009/07/skirt.html

As a matter of fact, the entire blog “Life in Travel”( http://life-in-travel.blogspot.com/) is an intriguing read on fashion, style, cuisine, and travel. I thought this particular DIY is quite worthy of mentioning for both its design uniqueness and construction simplicity.

Saturday, January 30, 2010

Maternity Pants with Maternity Panel

I wrote this tutorial 2 years ago when I was first starting my blog. Since the quality of maternity sewing patterns, in my opinion, has not improved much, I decided to edit my tutorial (the initial version was not very clear), and re-post it.

There are three ways you can go about sewing a maternity pant:
1. Adapt an existing non-maternity pant that you can pull over your hips,
2. Adapt a sewing pattern for a non-maternity pant , and
3. Draft a pant pattern yourself and adapt it to use while pregnant.
Either way, the steps you go through are about the same.
I will begin with some notes on the fabric for the project:
1. Pant fabric: Regardless whether you are sewing the pant or using a RTW one, you want the fabric to have at least 5% crosswise stretch to it. I used the word "want," because you don't have to go with stretchy fabric. Nonetheless, crosswise stretch will be practical and more comfortable.
2. Fabric for panel: must have 4-way stretch and must be nice on touch.
Starting point:
1. If you are not going to be drafting your pattern, choose a pattern for a non-maternity pant. You must choose one according to your current hip measurement (the waist measurement really doesn’t matter). Also, needless to say, a patern with a lot os details at the waist or just below, will be impractical. The pattern must be for a flat-front pant. The back pockets can be preserved, however, the front pockets will have to be eliminated.
2. If you are using a RTW pant, it must fit you around the hips (the fit at the waist is irrelevant). Additionally, it must be a flat-front pant, and idealy will have no front pockets.

Next, you must prepare the pattern/RTW pant:
1. If you are sewing the pant (self-drafted or not), make the muslin leaving the top 3” from the side seams unsewn. Also, sew only about 3.5” from the front crotch. At this point you have to do a fitting and determine how the pants fit you in the hips and thighs, and do the necessary alterations .
2. If you are using a RTW pant, remove the waistband, unstitch the top 3” from the side seams, undo the front closure, remove the front zipper, and keep only about 3.5” from the front crotch sewn up.

Next, you have to establish where the "waistline" would be (at this point, a fitting buddy or even a willing husband/bf could be helpful, but I have done it by myself). Bear in mind that this is not a regular waistline, and I am using the word loosely. What I am refering to here and below, is the line where the pant will connect with the maternity panel. To determine the location of this waistline, mark a line that:
1. On the front: is just under the lowest part of your pregnant tummy. It is very easy to tell since the line should be right under the pregnancy bulge,
2. On the back: start from the side seam and continue in an upward direction aiming to hit the point of your natural (pre-pregnancy) waist at the CB.
The line (especially on the front) can look crooked. Straighten it as much as you can without disturbing the natural curvature of your body.
At this point you either transfer the marks on your pattern or remove what is above the marked line on your RTW pant (but remember to leave 0.5" for seam allowance).

Here is the sketch of the front and back of the pants:

Next, you have to make the maternity panel. I prefer the extended version that goes to just below your breasts, but you can go with any height you consider comfortable, even with a fold-down. The instructions below are for the extended version, however, it is easy to infer from them how to make a less high panel or a fold-down one.

You can buy lycra fabric (or other fabric with great recovery) for the panel. I prefer to use a seamless RTW lycra tank top. Alternatively, you can buy a maternity band from Target (a high-quality knock-off of the Bella Band). The advantage to using a tank top or a maternity band is the seamless-ness. If you are making the panel from fabric, decide on the width: it must go around the widest pat of your belly, be snug, but not compressing.

Now, you must put on the pants and pull your self-made panel/tank top/maternity band over your belly. The bottom of the panel must be over the previously marked waistline. Using chalk or a marking pen, mark the waistline from the pant on the panel. Next, determine how high you want your panel to be, and chalk-mark it on the panel. Make sure to add 0.5" seam allowance at the bottom line of the panel and 4" seam allowance at the top. If you are using a maternity band, you can use the top end of it and not change anything about it (it is tight as it is, and does not need elastic to stay up). Of course, if you are using a maternity band, the top line of the panel wil be straight, as opposed to curved (as on the sketch below). I prefer a curved line, for it covers the belly more adequately. Therefore, if you want a curved top line, use a self-made panel ot a tank top.

Here is the sketch of the maternity panel:

Sewing the maternity panel:
1. If you are making your own panel: sew the single side seam first,
2. Fold under 2” and zigzagg/topstitch it down,
3. Insert 1.5” wide elastic in the casing. If you want a narrower elastic, adjust the casing accordingly.

Lastly, you have to attach the panel to the pant. I'd use my serger to do so, however, if you don't have a serger, you can do it with your sewing machine using a small zigzag.

Here is a close-up of the extended panel attached:


This is how the pants look under a shirt (the panel is completely concealed):


This technique can be used for a skirt as well.